
Getting
Started
Whether you are a seasoned DIY’er or just starting out it is important to make sure you are well prepared for the job ahead. It is important to take the time to learn about the tools and techniques required for each type of project to ensure the quality of the finished product.
Tools
& Safety
Here is a list of the tools needed for most DIY tile jobs, big or small. Many of these tools are general purpose and most DIY’ers will have them around the house already, although some are more specific to tiling. Any tools you need can be purchased at Ceramic Decor. Be sure to take the proper safety precautions when working with tools and always read the manual for proper usage instructions.

Bucket

Notched Trowel

Coth

Pencil

Square

Sponge

Tape Measure

Tile Nippers

Mixer
-

Level
-

Utility Knife
-

Spacers
-

Tile Cutter
-

Rubber Grout Trowel
-

Safety Glasses
-

Wet Saw
-

Plumb & Chalk Line
-

Rubber Gloves
-

Knee Pads
Ceramic
Tile Safety
There are a couple of hazards in installing ceramic tile, but basic precautions will prevent injury. First, when cutting tile always wear safety goggles and a dust mask. Flying debris is common and dust is even more common. Tile nippers are perhaps the worst offender at shooting shards of ceramic that seem inevitably to fly toward someone’s eyes.
Try to keep tile adhesive and cement from exposed skin and direct inhalation. Ensure to wear a mask when mixing any powdered adhesive. Tile adhesive can remain sticky for long periods if left on fingers. Rubber gloves will go a long way to preventing skin exposure. Tile adhesive can be removed with water and soap or mineral spirits – wash your hands thoroughly.
Knee pads can prevent a few aches and pains, but they can sometimes be awkward. In any case, it is good to have a board or something to kneel on when applying floor tile. Any tool may be dangerous; be sure you are thoroughly familiar with their operation. Read the manuals for any power tools you use.
Tool Tips
Before starting have all your tools ready so there are no last minute trips to the hardware store, especially for time sensitive tasks like applying adhesive!
Cutting Tile
With a seemingly endless choice of tools available to do a tiling job, deciding exactly which tools you need for cutting the tiles can be quite confusing. Tile cutters can be split into manual and powered. How much you spend on tile cutters depends on three things: how much can you afford, how confident are you with tools and how much tiling are you doing.
Tile Cutters
Tile cutters are mainly for straight cuts. If you are laying a diagonal pattern and have to do diagonal cuts, measure the size of the tile from corner to corner and buy a tile cutter that is wider than that.
Tile cutters allow you to cut more tiles more efficiently and with greater confidence, ensuring that the tile measurement is exactly what you want for multiple cuts needed.
Powered Tile Cutting Wet Saws
Tile cutting saws, or wet saws, are primarily used for larger jobs or natural stone installations. They’re used to make both straight and L-shaped cuts.
These saws are electric powered and are known as ‘wet’ tile cutting saws, as they use water to cool both the blade and the tile. This is your best option if you have a large surface area or many rooms to tile.
Hand Held 4” Grinder
Depending on the tile or stone used, an angle grinder can also be used as a tile cutting tool primarily used to cut L-shaped or circular cuts.
Hole Boring Drill Bits
These drill bits come in multiple sizes and are used to cut out circular holes on ceramic or stone products.
Pro Tip
Porcelain tile is very hard and brittle, and can often chip when cut. When cutting these tiles, maintain a slow, steady and even pressure to avoid cracks and chips. To ensure clean corners, cut a 2” relief slit along the end and then flip the tile around to finish the cut.
If you are cutting porcelain with a saw that allows you to adjust the depth of the cut, make several shallow cuts about 1/8” deep to reduce the risk of chipping.
How to Measure
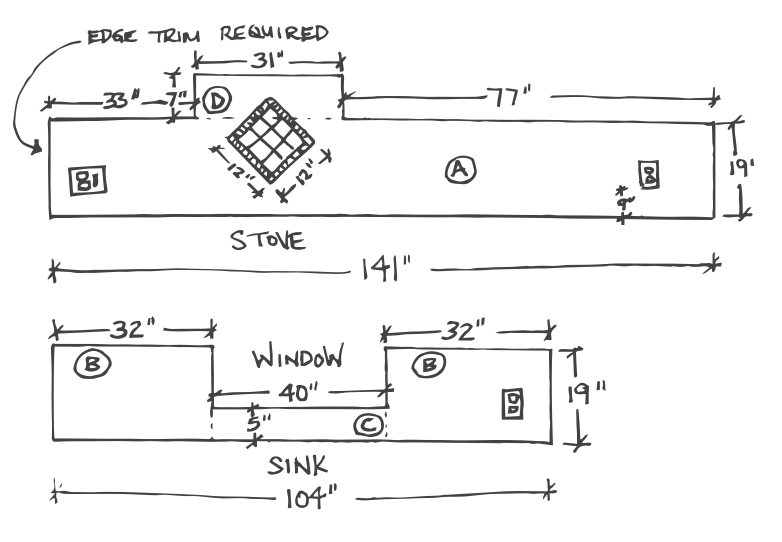
Doing The Math
| A = 19”x141” | 2679 sq.in. |
| B = 19”x(32”+32”) | 1216 sq.in. |
| C = 5”x40” | 200 sq.in. |
| D = 7”x31” | 217 sq.in. |
| Total | 4312 sq.in. |
| divided by 144 | 29.94 sq.ft. |
| + 10% waste | 33 sq.ft. |
Measure the area you wish to have tiled. Normally this will be between the counter top and the upper cabinets.
Include the height and width of each section. Make note of the existing condition of the wall, as it must be reasonably flat and in good condition. NOTE: if you have existing tile installed consult your sales person on what needs to be done.
You may decide to tile behind the fridge and stove completely or simply “fake it” around the appliances so once in place it appears as though the tile is filled in completely.
Creating a diagram or marking dimensions on a photograph can be a great tool for reference.
When using borders, inserts or inlays, ensure you mark the location of switches and receptacles. This is so accents can be calculated and installed without interfering with any wall mounted fixtures. NOTE: tile cannot extend partially across any wall fixture as the plate cover will not sit flat. Some tiles with a very uneven surface may not be suitable for areas with wall fixtures.
On your sketch or photograph mark the location of any accents or borders. Indicate where any trim may be required to cover tile edges.
Calculate your total tile area needed by multiplying width by length of each of the various wall sections, and add them together.
NOTE: Include a waste factor of 10-15% to ensure you have spare tile for any possible future repairs or changes.
A backsplash serves not only as a stylish addition to you kitchen, but as protection for walls from unintended splashes, stains and odours.
Frequently Asked Questions
Refer to the How to Measure a Backsplash instructions in this guide [see Kitchen Backsplashes: Page 10]. The same basic principles apply to measuring for all tile installation.
Spacers are used to keep consistent spacing between your tiles (grout joint). DIY’ers should always use the appropriate spacers and we have sizes for all tile installs in our tool area.
n.
Yes. Always add approximately 10% extra for waste. This will allow for cutting and fitting of tile. If you are using large format tile in a small space, you may need to apply 15% or even 20% extra for waste.
Follow the instructions in the guide for the area that
you are tiling. Each type of tile installation will require
different preparation.
Any size tile can be used in a small space. Smaller sizes often look busier because of the extra grout joints.
Our Grout Selector Chart [see Page 28] outlines all of the grout choices and will help you make the right choice.
See the installation instructions on how to cut tile. We also carry many drill bits and hole boring kits that will assist in making these complicated cuts.
Ceramic Decor carries a full line of professional grade tile cleaning and maintenance products. Review the maintenance chart in this guide for the appropriate products. [See page 27]
We rent our wet saws for a nominal fee much lower than other rental stores. If you purchase your tile from Ceramic Decor you are able to borrow a score and break tile cutter and nippers free of charge.
Ceramic Decor can cut your tiles for you. All tiles need to be marked by you in the exact way that you want them cut with either pencil or construction crayon. We charge a nominal
fee for cuts.
We offer tool rentals and provide in house cutting for tough cuts.Ask one of our sales staff for more information on tools, rentals and in house tile cutting.